StarWarsMod4AirMash
StarMash - Extensions and Themes - Part 1 - Introduction
This is a guide for the creation of extensions and themes for the StarMash Mod for AirMash.
Read this if you are interested in creating your own features and themes for AirMash.
This is part 1 of a multi-part tutorial.
StarMash - Extensions and Themes - Part 1 - Introduction
StarMash - Extensions and Themes - Part 2 - Basic Extension.
StarMash - Extensions and Themes - Part 3 - Settings.
StarMash - Extensions and Themes - Part 4 - Themes.
StarMash - Extensions and Themes - Part 5 - Advanced Themes.
In this part, you will learn:
- An brief introduction and how to use extensions.
- How StarMash works.
- How StarMash Extensions work.
- How to respond to StarMash events.
- How to create the most basic extensions.
What will I be able to create?
- Well, it depends on your background. This guide is mainly orientated to people that have some basic previous programming knowledge. If you don’t know how to write JavaScript code, I hope that after reading this you will be able to create some basic Themes, by adapting a theme template and then editing the images in your favorite image editor. But I can’t guarantee that you fully understand everything.
If you can write JavaScript code, then you will be able to create complex and cool extensions and themes! The idea was to give the extensions a lot of freedom to do practically anything. That’s why you’ll have plenty of options for injecting code to the game at every step of the application’s life cycle.
For example, the whole StarMash v2 Theme, that heavily changes the whole graphics stack, is also contained within an extension… so that should give you an idea of what can be done.
What will not be covered by this guide?
Programming tutorial
First of all: This is not a programming tutorial!
I will assume that you have some basic programming knowledge, and that you can understand some very basic JavaScript code.
While I’ll try to keep it as simple and documented as possible, I will not explain basic programming structures or patterns that might be mentioned.
Hosting
When you create an extension, you will need a place on the web where you can publish the file, so others can have access to it. This small guide will assume that you already have access to some hosting service. If you don’t, and don’t know how to obtain one, you will first need to find a tutorial that teaches you how to host your own files on the web, as that exceeds the scope of this guide.
Image Editing or Web Design
Another thing that exceeds the scope of this tutorial is the use of applications like Photoshop, Gimp, Blender, 3D Studio, or whatever you might want to use to create the resources for your Themes. It’s up to you to choose the applications you want to use, and learn how to use them.
The Basics
In this document, I’ll talk about extensions and themes. So, first of all, let’s define those terms in the context of this document.
What’s an Extension?
An extension is just a JavaScript file, that contains the code for some new feature(s) and/or theme(s). Consider it as a StarMash plug-in. What makes this JavaScript file special, is that when it’s loaded by the browser, it registers itself as a StarMash extension, and also informs of its dependencies and themes. We will see how that’s done later.
An extension can have any kind of code in the file, that makes almost anything you can imagine with the game. And also, it can declare some dependencies that should be loaded when the game starts. Finally, it can contain the code for new Themes.
What’s an Theme?
A Theme is a class that defines certain methods that will be used by StarMash to change the look of the game. An extension can contain multiple Themes, but they must be declared when the extension registers itself on load, in order to let the user apply those themes.
Examples of Themes would be: Vanilla Theme (AirMash’s default look), StarMash Themes, World War 2 Theme.
Getting started:
Before we can begin creating extensions and themes, let’s start with the most simple thing:
- Adding extensions to StarMash
As of now, adding new extensions is a manual process, because there isn’t yet an extensions directory/database where you can find them. So, for the time being, just follow these steps:
- The most important thing that you need to know about an extension, is it’s URL, that is, the web address for the extension. Until there’s a database, a good place to find extensions created by other users is AirMash’s Reddit Page. For this example, we will use the following URL: https://molesmalo.github.io/StarWarsMod4AirMash/assets/christmasmod.js So, copy that link address.
- Open the game. If StarMash is not installed, refer to this page and follow the instructions to install the Mod.
- On the Main Screen, open the Extensions Window by clicking the
Themes and Extensionsbutton. Here, all the themes and extensions that are loaded now, are displayed. - Click
Add new extensionand a panel with a text input box will appear. - Paste the URL you copied on step 1 into the input box.
- Click the
tick-buttonto initiate the loading of the extension. -
The panel should now change, showing the following information of the extension:
Christmas 2017 Theme Extension Happy holidays and merry Christmas! by Bombita, ver: 1.0
Also, a new theme should be available now in the Themes section, when you open the drop-down list.
- Click the
Acceptbutton. The game will now reload to properly load the extension.
Congratulations!
You’ve loaded a StarMash Extension!
Now, you can go back to the Extensions window (clicking Themes and Extensions), and check that the extension is now displayed automatically in the extensions list. You can also check that there’s a toggle switch to the left of the extension’s description. This switch lets you enable/disable the loading of the extension when the game loads. There’s also a Cross button, that lets you delete the extension from the mod.
StarMash Life Cycle
Before we go on and start creating our first extension, I want to talk a little about how StarMash works and what happens on the backstage. You might skip this section if you are not a developer, and don’t care or understand much about code.
But I’ll explain this so you can have a better understanding of how this Mod works so you can then create better extensions on your own. So, let’s dive a little into StarMash internals.
Event-Driven Extensions
First of all, I want to talk about events. StarMash Extensions works pretty much following an Inversion of Control design, and are Event-Driven. What this means, is that they do not control the flow of the program. Instead, StarMash will invoke certain predefined methods, that the extensions and themes should should accept, and will also trigger some events that the extensions can subscribe to.
Examples of those events are gameRunning , playerAdded , playerKilled.
Now, let’s dive a little deeper, into the guts of this Mod…
Internals
StarMash’s main function is called SWAM. You will see SWAM called several times in this document. Let’s see now how the mod works.
StarMash is basically a pretty large hack that works by replacing the original JavaScript file loaded by the game (called engine.js), with another file heavily modified by me. What this new file does, beyond adding some new features to the game, is alter the way game is run after the page is loaded.
If you have prior knowledge of JavaScript, you might already know the jQuery.ready function. As jQuery docs put it:
This function offers a way to run JavaScript code as soon as the page’s Document Object Model (DOM) becomes safe to manipulate.
The original AirMash code starts it’s execution on this method, so the game engine starts loading resources, and rendering the game as soon as the page is loaded.
In StarMash, this changes. The original game code is encapsulated within a function, and only the objects that the original game code decides to make public are exposed. This function, however, is not executed immediately when the page is ready (jQuery.ready).
The code execution is as follows follows:
-
First all AirMash dependencies are loaded as usual.
-
Then, some StarMash code that loads the extension management code is executed. StarMash checks a list saved locally to see what extensions should be load on start, and proceeds to load them together with its dependencies. Attention! All the extension code that is not within a function in the extension file will now be executed!
Once all the extensions are loaded, it executes what could be considered StarMash’s main startup function. Let’s see how this function looks like:
    SWAM.loadExtensions(()=>{
        SWAM.trigger("extensionsLoaded");

        SWAM.loadTheme();
        SWAM.trigger("themeLoaded");

        loadGameCode();
        SWAM.Theme.loadGameModules();
        SWAM.trigger("gameLoaded");

        RunGame();
        SWAM();

        SWAM.Theme.start();
        SWAM.loadSettings();

        SWAM.trigger("gameRunning");
    });
It’s a very small piece of code, but there’s a lot of stuff going on there:
First of all, the extensionsLoaded event is triggered, informing any extension that is subscribed that all extensions are now loaded.
Then instantiates the selected Theme, that is, the selected Theme’s constructor method is executed. Why at this point? You might ask. Fair question! Because a Theme must provide some methods that will be invoked when the game code is loading.
After the theme constructor is executed, an event called themeLoaded is triggered.
Then, it proceeds to load the original AirMash code, with the exception of two Modules: Graphics and Sound.
Immediately after this, the loaded Theme is requested to select and run the version of the modules Graphics and Sound that it needs.
- Out of the box, StarMash offers two versions for those modules, an original version, and a modified version, used by StarMash v1 and v2 Themes. For the modified Graphics module, it changes the way some parts work (like parallax, and blending), removes some layers and add others. For Sounds, it changes how the game selects the thrust sound for each ship (each of the 10 ships has its own sound), and adds some other sounds. It’s up to the theme developer to choose to use the original version, one of the modified versions, or provide a custom version of his own. I guessed that if I needed to provide a modified version for those modules, others might have the same need when they want to create truly advanced themes, so the option is there if you need it. But in 99 percent of the cases, YOU WILL NOT NEED TO DO IT. That’s why the Base theme from where you will inherit your Themes already has an implementation that loads the original versions, so you don’t have to worry about it, unless you REALLY want to.
When loading the game code, two Theme methods will be invoked: Theme.injectTextures() and Theme.injectSounds(). If you added new files or sprites, and want to declare new textures and sounds, this is your chance.
Once the original game code, the Graphics module and Sound Module are loaded, an event called gameLoaded is triggered to inform extensions that the game code is fully loaded. This is your last chance to get access to the untouched game methods before the game starts running and StarMash starts overriding methods them with its own code.
NOTE: In most cases (almost always I would say), you should just ignore the events extensionsLoaded, themeLoaded and gameLoaded, but I wanted to give you an option in the rare cases where running code at those instances might be helpful for your extension. But I must warn you that those events were created for debugging purposes and might be deleted in future versions of the Mod.
Now, AirMash’s Main Function (the one that was originally executed in jQuery’s ready function), now renamed RunGame, is invoked. Immediately after that, StarMash (SWAM) is properly executed.
After SWAM finishes doing its stuff, the Theme.start() method is called, signaling the theme to start doing its stuff. If your theme does some advanced stuff, like adding layers, replacing others, etc… this is where it should start doing it!
Finally, the settings are loaded and an event called gameRunning is triggered. If your extension needs to run code once the game is fully loaded and running, this is the event you need to subscribe.
Events:
As mentioned before, StarMash Extensions work by responding to events triggered by StarMash. This way, it becomes super easy for extension developers to make new features that respond to game events. The way you subscribe to an event is as follows:
    SWAM.on( event, handler );
    // event: The event name, such as "playerAdded" or "playerDestroyed"
    // handler: A function to execute when the event is triggered.
So, for example, we can declare the following piece of code:
    SWAM.on("playerAdded", function(player) {
        console.log(player.name + " joined the game.");
    });
In this example, we listen to the playerAdded event, and write in the console every time a new player joins the game.
The following table contains the current list of events triggered by StarMash, and their corresponding arguments. I might add new events eventually. If you feel the need for a particular event to be triggered, please let me know, and I’ll see if it should to the list or not.
| Event | Arguments | Description |
|---|---|---|
| extensionsLoaded | All the extensions are now loaded. | |
| themeLoaded | The theme constructor has been invoked. | |
| gameLoaded | The game code is loaded and ready to run. | |
| gameRunning | The game is now running. | |
| gamePrep | The user joined a game. | |
| gameWipe | The user left a game. | |
| CTF_MatchStarted | A new CTF Match started. | |
| CTF_MatchEnded | data | A CTF Match ended. |
| CTF_Flag | data | A flag was taken/returned/captured. |
| CTF_FlagEvent | event, team, verb | A flag was taken/returned/captured. |
| BTR_MatchEnded | data | A BTR Match ended. |
| spectate | id | The user is spectating a player. |
| playerAdded | player | A new player joined. |
| playerDestroyed | player | A player left the game. |
| playerReteamed | data | A player changed teams. |
| playerRespawned | data | A player respawned. |
| playerImpacted | data | A player was hit. |
| playerKilled | data, dead, killer | A player was killed. |
| playerUpgraded | index | The user upgraded his ship. |
| playerPowerUp | data | The user received a powerup. |
| playerStealth | data | A player changed its stealth. |
| playerChangedType | data | A player changed its plane type. |
| playerChangedFlag | data | A player changed its flag. |
| playerSay | data | A player said something using a chat bubble. |
| mobAdded | data, existing, playerId | A new mob is created. |
| mobDespawned | data | A mob is despawned. |
| mobDestroyed | data | A mob is destroyed. |
| serverMessageReceived | data | The server sent a message. |
| scoreboardUpdate | scores, minimap, maxScoreboard | A scoreboard update was received. |
| detailedScoreUpdate | data | A detailed scoreboard update was received. |
| chatLineAdded | player, text, type | A chat line was received and added to the chat. |
| rendererResized | width, height | The game area changed its size. |
| keydown | event | The user pressed a key while playing. |
| keyup | event | The user pressed a key while playing. |
| minimap_click | event, x, y | The user clicked the mini-map. |
| canvas_click | event | The user clicked. |
| canvas_mousedown | event | The user pressed a mouse button. |
You can also use SWAM.one(event, handler) to set a handler that will run only once, and then detach from the event. The .one() method is identical to .on(), except that the handler is unbound after its first invocation.
    SWAM.one( event, handler );
    // event: The event name, such as "playerAdded" or "playerDestroyed"
    // handler: A function to execute when the event is triggered.
Just like using jQuery, to remove an event handler, that is, to stop receiving events of a type in your function, when calling SWAM.on(event, handler), handler needs to be a function that you can then reference later.
Then, you can call SWAM.off(event, handler), passing a reference of the handler function to stop receiving events.
    SWAM.off( event, handler );
    // event: The event name, such as "playerAdded" or "playerDestroyed"
    // handler: A function that is currently executed when the event is triggered.
Creating my first extension:
Enough theory! When do we start coding?
Now that you know how to load extensions, why don’t we try to create our very first StarMash Extension?
As I said previously, an extension is simply a JavaScript file. So, open your favorite code editor and create a new file. Let’s work!
Paste in the file the following VERY IMPORTANT piece of code:
    !function() {

    }();
Hey! Are you nuts? That function is empty! Why is it so important then?
Simple. That’s an Anonymous Function used as a way of implementing a Module Pattern in JavaScript. I will not talk much about it, you can read other pages like this to learn more.
You will write your code inside this function. Why? Because it provides you a new context to work, where your code is not exposed to the global code (or other extensions). So, for example, you don’t have to worry about naming a variable the same way as another declared in other extensions, and thus breaking things. What you declare here will have a local scope. Also, your code will not be accessible to code outside this function. So you can control what you want to expose.
Let’s go on. Now, we will add some code inside our Module. So your file should look like this:
    !function() {
        SWAM.registerExtension({
            name: "Tutorial 1",
            id: "Tutorial1",
            description: "This is my first extension!",
            author: "YOUR_NAME_HERE",
            version: "1.0"
        });
    }();
If you want, you can change now the text for the fields: name, description, author and version to whatever you want.
Save the file, and congratulate yourself. Because you have just written your very first StarMash extension! Now, publish it on your test server and then load it in StarMash.
Let’s see what this code does:
SWAM.registerExtension is a StarMash function. Calling this function, you register this file as a StarMash Extension. There can only be one call to SWAM.registerExtension per file. Otherwise, when you attempt to add the extension, an error will be shown telling you that a file can only be registered once.
registerExtension accepts an object with the following properties:
-
id: The extension’s ID. It’s used to avoid having an extension registered multiple times accidentally. And also used as the root object for settings saved by this extension. This ID might be changed later for an auto-generated ID. But for the time being, I’m giving the option to let it be chosen by the extension’s developer.
- name: The extension’s name/title. Use something descriptive.
- description: A text describing what your extension does.
- author: Your name!
- version: The extension’s version.
- dependencies: An array of JavaScript files (URLs) that should be loaded as dependencies for your extension.
- themes: An array of Theme functions., We will see this later.
- settingsProvider: a
SettingsProviderobject, used only if your extension needs to save settings. We will see this later.
So.. this extension does nothing at this point. I only has the minimum code needed to be corretly loaded by StarMash.
Let’s add some code to debug the StarMash life cycle as described above. For this, we will subscribe to several events. So, modify the file to make it look like this:
    !function() {

        // This line will be executed as soon as the extension is loaded
        console.log ("Tutorial: This is executed as soon as the extension is loaded.");

        // Here, we subscribe to some events:
        SWAM.on("extensionsLoaded", function() {
            console.log ("Tutorial: All the extensions are now loaded.");
        });

        SWAM.on("themeLoaded", function() {
            console.log ("Tutorial: The Theme constructor has been invoked.");
        });

        SWAM.on("gameLoaded", function() {
            console.log ("Tutorial: The game code is loaded and ready to run.");
        });

        SWAM.on("gameRunning", function() {
            console.log ("Tutorial: The game is now running.");
        });


        // Finally, we register the file as an extension
        SWAM.registerExtension({
            name: "Tutorial 1",
            id: "Tutorial1",
            description: "This is my first extension!",
            author: "YOUR_NAME_HERE",
            version: "1.0"
        });
    }();
Save it, open the Developer Tools console (Control+Shift+I), and refresh the page. After refreshing, the console should look something like this:
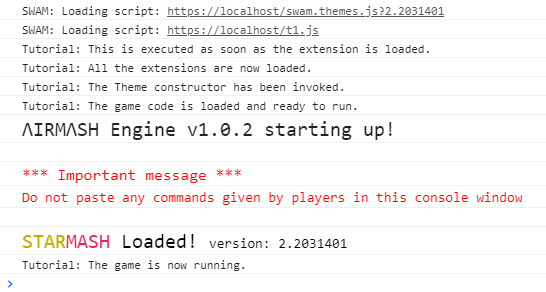
So here, we have used some special events fired by StarMash at during the loading process. As you see, the lines of code that are outside an event handler are executed immediately when the extension is loaded. This is why, in most cases you want to put your code inside event handlers. So it can run at the proper time, reacting to what’s happening during the game.
Rounding up
Ok, I think we have just left behind the most boring stuff. The point of this article was to learn the basics of how StarMash extensions work, how to load them and how to write the most basic examples.
If you are still here reading this, thank you!
And get ready, because on the next article we will start creating some real and funny extensions!