StarWarsMod4AirMash

StarMash - Extensions and Themes - Part 3 - Settings
This is a guide for the creation of extensions and themes for the StarMash Mod for AirMash.
Read this if you are interested in creating your own features and themes for AirMash.
This is part 3 of a multi-part tutorial.
StarMash - Extensions and Themes - Part 1 - Introduction.
StarMash - Extensions and Themes - Part 2 - Basic Extension.
StarMash - Extensions and Themes - Part 3 - Settings
StarMash - Extensions and Themes - Part 4 - Themes.
StarMash - Extensions and Themes - Part 5 - Advanced Themes.
In part 3, you will learn:
- How to use a
SettingsProviderobject that will let you show custom settings for your extension in the Settings Window.
Give your users a choice
Hello again! If you’ve read Part 1 and 2 of this tutorial, by now you’ve learned how StarMash Extensions work, and you have already created your first extensions. If not, I would suggest you to go back and check those articles before you continue reading this.
In the previous examples, we saw how you can make extensions that alter the game in some form. But as your extensions get more complex, and you add more and more features to them, comes the question:
What happens when a user likes some of the features your extension provides, but they don’t like others?
What if they want to use your extension because they like something new you’ve created. But they dislike some other thing.
Or if some part can’t be used because it’s incompatible with some other extension?
As every other piece of software out there, the answer to this problem is very simple:
- Provide a way to let the user choose what features are enabled or disabled.
- Let the user customize their experience.
Generally, that’s done providing a Settings/Preferences/Options (however you prefer to call it) Window. And StarMash is no exception. But, why provide your own window, when there’s already a Mod Settings Window?
Is there a way to insert your own options into the Settings Window?
Yes, there is. And it’s done using a StarMash class named SettingsProvider.
Creating a SettingsProvider instance
What this class does, is provide a way for extensions and themes to insert their own settings into the Settings Window, and manages how they are stored locally on the browser’s local storage.
To create a new instance of SettingsProvider, you need to pass two arguments:
defaultValues: a JSON object with the default values for your extension’s settings.onApply: a callback function that is going to be called when the user changes the settings.
So, imagine for a second that your extension needs to handle two settings: a string text1, and a boolean isFeatureEnabled. You need to provide options in the Settings Window to let the user set those values.
You create an instance of SettingsProvider like this:
    let defaultValues = {
        text1: "some text",
        isFeatureEnabled: true
    };

    function onSettingsApplied(mySettings)
    {
        // Here we do something when the settings are applied
    }

    let sp = new SettingsProvider(defaultValues, onSettingsApplied);
or, if you prefer a shorter version:
    let sp = new SettingsProvider({ text1: "some text", isFeatureEnabled: true },
        (mySettings) =>
        {
            // Here we do something when the settings are applied
        });
Use the notation you prefer for your coding style.
Now that we have the instance, we can start creating our own section in the Settings Window, adding controls and descriptive text.
Adding sections to the Settings Window
Sections are visual separations of the Settings Window. It’s useful to separate settings into different categories, to make it easier for the user to find the options he wants to change.
Take this example. Here, the StarMash v.2 Theme uses three different sections: Background, Asteroid field and Decorative Objects.

The main mod settings also uses three different sections: General, Interface and Audio.
A SettingsProvider object needs at least one section to display controls. So, let’s create our section:
let section = sp.addSection("My Settings");
Easy, right? The method addSection (title) takes one parameter, a string indicating the title to display for the section (like “Background” in the image above), and returns a SettingsSection object.
We can then add controls to display settings to this section. For our example, let’s do it like this:
    section.addBoolean("isFeatureEnabled", "Some feature description.");
    section2.addString("text1", "Some other description label.");
There, we add a toggle switch, that will handle the property isFeatureEnabled of your setting values, and an input field for the text1 property, with their respective descriptive labels to their right.
A SettingsSection object currently accepts the following methods (with its corresponding arguments):
addSeparator (options): Adds a separator line… It’s just a line.
- options:
- css: jQuery css object
addButton (label, options): Adds a button.
- label: text for the button.
- options:
- click: handler function for the button.
- css: jQuery css object
addBoolean (property, label, options): Adds a toggle switch OR checkbox that is bound to a setting.
- property: name or path of the property you want to bind the control to.
- label: explanatory text for the setting.
- options:
- useToggle: boolean indicating if the control should render a toggle switch or a checkbox. (Default is true)
- css: jQuery css object
addString (property, label, options): Adds a text input box that is bound to a setting.
- property: name or path of the property you want to bind the control to.
- label: explanatory text for the setting.
- options:
- maxLength: maximum length for the text.
- css: jQuery css object
addValuesField (property, label, items, options): Adds a selection box that is bound to a setting.
- property: name or path of the property you want to bind the control to.
- label: explanatory text for the setting.
- items: a key/value object containing all the admitted values and its respective label.
- options:
- css: jQuery css object
addSliderField (property, label, options): Adds a slider control that is bound to a setting.
- property: name or path of the property you want to bind the control to.
- label: explanatory text for the setting.
- options:
- min: Integer. Minimum value allowed.
- max: Integer. Maximum value allowed.
- step: Integer. Increment for each step of the slider.
- css: jQuery css object
Creating an useless extension with settings
Let’s create an extension that does nothing but provide settings.
/*----------------------------------------------------------
    StarMash Extensions Tutorial - Part 3 A - Controls
----------------------------------------------------------*/
!function()
{
    function createSettingsProvider()
    {
        // This is the handler that will be executed when new settings are applied
        function onApply(values)
        {
            console.log ("New settings applied: ", values);
        }

        // Default values for the settings
        let defaultValues = {
            bool1: false,
            bool2: true,
            string1: "hello world",
            values1: "b",
            slider1: 25,
            category1: {
                n1: true
            }
        };

        let sp = new SettingsProvider(defaultValues, onApply);

        let section = sp.addSection("First Section");

        section.addBoolean("bool1", "This is a checkbox.", {useToggle: false});
        section.addBoolean("bool2", "And this is a toggle switch.");

        let section2 = sp.addSection("Second Section");
        section2.addString("string1", "This is an input box for string1.", {maxLength: 10});
        section2.addSeparator();
        section2.addValuesField("values1", "A selection box with some values.",
        {
            "a": "Value A",
            "b": "Value B",
            "c": "Value C"
        });
        section2.addSliderField("slider1", "This is a slider control.",
        {
            min: 0,
            max: 100,
            step: 5
        });
        section2.addSeparator();
        section2.addBoolean("category1.n1", "N1 is inside category1.");

        // we return our SettingsProvider instance
        return sp;
    }

    // Register the file as an extension
    SWAM.registerExtension({
        name: "Tutorial - Part 3 A",
        id: "Tutorial3a",
        description: "An useless settings demo!",
        author: "YOUR_NAME_HERE",
        version: "1.0",
        settingsProvider: createSettingsProvider()
    });
}();
In this example, we create a local function called createSettingsProvider.
Inside this function, we create a new instance of SettingsProvider, passing it an object with the default values for our demo settings, and a handler function that will write to the console every time the Accept button of the Settings Window is pressed and new settings are applied.
This function is also executed when StarMash is loading, and settings are recovered from the browser’s local storage.
Next, we create two sections, and add them some controls bound to our settings.
If you load this demo extension to StarMash, and open the Mod Settings Window, you should see this at the bottom:
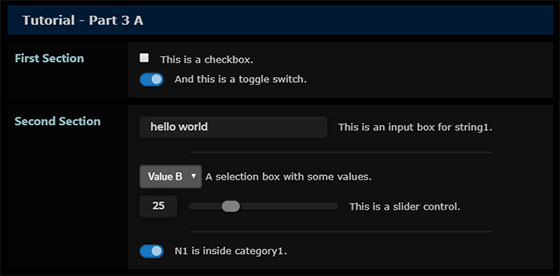
Here we have our two sections with its respective controls.
And if you check the console when accepting the settings, you will get something like:
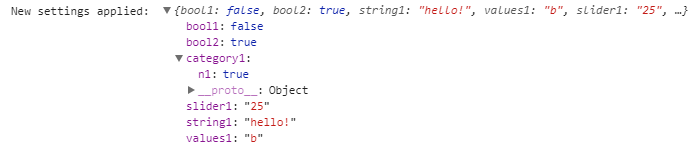
You can now change some values, accept, and refresh the page.
Go back to Mod Settings and check that the changes you’ve made are still there. That’s because they are automatically saved by StarMash, so you don’t have to worry about how to store them.
Perfect! Now we have our own custom settings. Let’s see how we can use them.
Using our own settings
It’s time to put some settings to good use.
Let’s continue with our extension from Part 2. We will add two options, for enabling/disabling the bubbles when the user is hit or the user kills other player. In the second case, we will also let him customize the message.
So, first of all, let’s define at the beginning of our module:
- Our settings
- A function to call when new settings are set
- A function that creates our
SettingsProviderinstance. - Then, let’s add a check at the beginning of our event handlers for
playerKilledandplayerImpactedto know if the bubbles should be sent. - Finally, in the case of
playerKilled, lets replace our old message for the one set by the user.
/*----------------------------------------------------------
    StarMash Extensions Tutorial - Part 2
----------------------------------------------------------*/

!function() {
    // Default values for the settings
    let settings = {
        sayWhenHit: true,
        sayWhenKill: true,
        killMessage: "Sorry $player!",
    };

    // This is the handler that will be executed when new settings are applied
    function settingsApplied(values)
    {
        settings = values;
    }

    // creates an instance of SettingsProvider
    function createSettingsProvider()
    {
        let sp = new SettingsProvider(settings, settingsApplied);

        let section = sp.addSection("Bubble Messages");

        section.addBoolean("sayWhenHit", "Send bubble when I'm hit.");
        section.addBoolean("sayWhenKill", "Send bubble when I kill someone.");
        section.addString("killMessage",
            "Text to send when killing someone. Use $player to refer to your target's name.",
            {maxLength: 30});

        // we return our SettingsProvider instance
        return sp;
    }

    // When a player is killed, say Sorry to him vía a bubble!
    SWAM.on("playerKilled", function(data, dead, killer){
        if (!settings.sayWhenKill)
            return;

        if (killer.id == game.myID)
        {
            // An enemy was killed. But we are polite, so we say sorry vía a bubble!
            Network.sendSay(settings.killMessage.replace("$player", dead.name));
        }
    });


    let lastPhraseTime = 0;

    SWAM.on("playerImpacted", function(data)
    {
        if (!settings.sayWhenHit)
            return;

        let playerId = data.players[0].id;

        // If it's not me, quit
        if (playerId != game.myID)
            return;

        let now = new Date().getTime();

        // If the time between the last message
        // and now is less than 3 seconds, we exit
        // to avoid being throttled by the server
        if (now - lastPhraseTime < 3000)
            return;

        let phrases = null;
        let player = Players.get(playerId);
        lastPhraseTime = now;

        // If it was a 'light' hit
        if (player.health > 0.35)
        {
            phrases = ["Ahhh!", "I'm hit!", "ARRGG!", "They've got me!",
            "I need help!", "Ouch!", "Don't do that!", "Shields down!",
            "Damn!", "Nothing serious!", "Redirecting power!", "Oh dear!",
            "I'm fine!", "Still fine!", "Don't fail me now!",
            "Droid, full power!", "My ship!", "The paint is still new!",
            "Nothing to worry about", "Oh c'mon!", "You'll pay for this!",
            "Oh please!", "I'll make you pay!", "Goddam!", "I'm still here!",
            "Focus, focus!", "You've trained for this!",
            "I didn't sign up for this!", "I'm gonna get you!", "Just a scratch!",
            "C'on " + player.name + "!"];
        }
        // if it was serious, but I'm still alive
        else if (player.health > 0)
        {
            phrases = ["Heeeelp!", "Eject, eject!", "Critical hit!",
            "NOOO!", "AHHH!", "May the fo-...", "I've lost my shields!",
            "F***!", "I lost my droid!", "General failure!", "Arrrrhhh!",
            "-NOoo!", "Please please! please!", "I'm hit! I'm hit!",
            "Tell my wife...", "Come on... COME ON!", "Don't fail me now...",
            "I can do it!", "Ahhhhhrrr!!", "Nooooooooo!",
            "I can't take much more!"];
        }
        else return;

        // choose a random phrase
        let index = Tools.randInt(0, phrases.length - 1);

        // and send that phrase as a bubble
        Network.sendSay(phrases[index]);
    });


    // Register the file as an extension
    SWAM.registerExtension({
        name: "Tutorial - Part 3",
        id: "Tutorial3",
        description: "Using Settings",
        author: "YOUR_NAME_HERE",
        version: "1.0",
        settingsProvider: createSettingsProvider()
    });
}();
Of course, we could improve this code. Even if sayWhenHit and sayWhenKill are false, our event handlers are still called just to return immediately. We could make that they are not called at all (that is, detaching the handler for the event using SWAM.off (event, handler) ).
I’ll leave that as an exercise for the reader.
Rounding up
Great! Did you see how easy it is to work with custom settings for your extension?
SettingsProvider makes it super simple. And I have some good news for you. All of this is exactly the same when you want to provide custom settings for your themes!
And talking about themes, that’s the topic for the next article, so… I hope to see you there!